How to rename your "master" branch to "main"
As a certified B-Corp, and as a company that thinks that diversity and inclusion are really important, we try to be mindful of our language.
Words matter. The norms around language are constantly changing. When signals arise from our community that specific lingo is hurting certain groups of people, we will take care to learn — and act.
Thus it was for the term master, traditionally used to mark the default branch of Git repositories.
master and slave have long been common terms in computing, denoting the relationship between processes or devices. It feels kind of obvious now, that people whose life is affected by actual slavery wouldn’t want to be reminded about that in their work. And so the industry default has moved to the more neutral term main.
We followed suit, and are currently in the process of renaming our existing repositories’ branches to main.
This quick post will remind you of the necessary steps.
Rename your local branch
Let’s start with your local machine. Before doing anything, make sure you don’t have any local changes, by checking git status!
Then, to rename your local branch, run:
git branch -m master main
If you would run git status, you’d see your local branch main is now setup to track remote branch master.
Let’s follow up and rename the remote branch as well.
Rename your remote branch
If you’re a GitHub user, it might be beneficial to execute this step from the GitHub UI, as they have some helpful features in place.
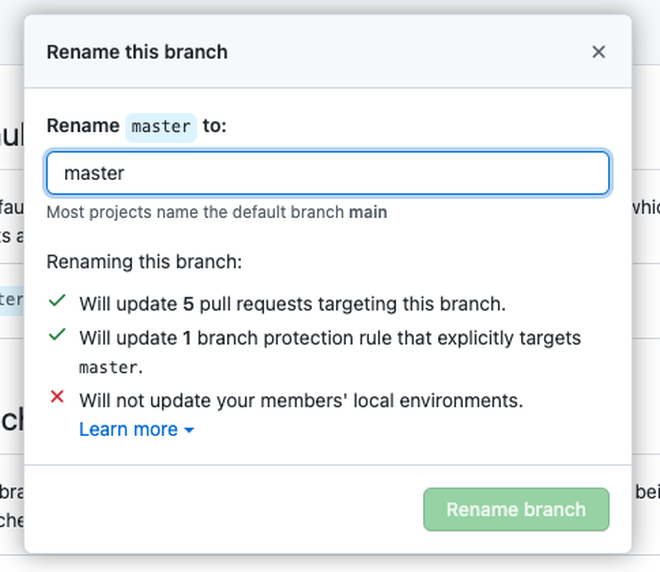
From the branches page of your repository, you can rename the branch by clicking the little pencil icon.

GitHub will automatically update open Pull Requests.
As you can see, GitHub makes this very easy, and automatically updates references to master.
If you take this route, you will have to update your local branch so that it tracks the new main branch on GitHub. Note that you have to perform git fetch first to make your local git aware of the new branch:
git fetch
git branch -u origin/main
Alternatively, if you choose to do all this from the command line, you can push your local main branch to the remote like this:
git push -u origin main
If that’s successful, you then separately remove the old master branch:
git push origin --delete master
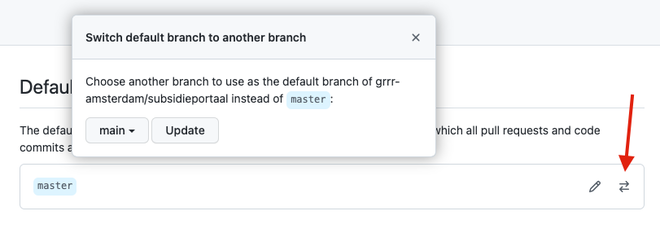
💡 Note that the removal will fail if your Git hosting platform still references the master branch as the default branch!
In that case you should first update your settings from its UI, and only then remove the old branch:

Update your default branch on GitHub before deleting the old default.
You’re all set!
What to tell your teammates?
Your teammates will still be referencing the old master branch.
They can rename their local branches in the same way you did:
git branch -m master main
Using git fetch, their local repository will be updated about new branches:
git fetch
They can then remove the connection to the old master branch, and switch over to main:
git branch --unset-upstream
git branch -u origin/main
Things to keep in mind
Updating a name in source code or any code-related facet should always be considered carefully.
Here are some common places the old name might be referenced:
- Check your documentation for links. If you deep-link to files in your repository, there might be branch information in the path, like this:
https://github.com/grrr-amsterdam/hansel/blob/master/index.mjs. Make sure to update these links. - Update your GitHub Actions. These can use the branch name as a version constraint, like this:
    steps:
    - uses: my-organization/my-workflow@master
Take special care if your workflow is used by other people. Removing your master branch will break their workflows!
- The same goes for package managers, such as NPM or Composer. If your package has been referenced by other people using master as the version constraint, it might be better to keep master around for a while, after moving over to main, just to make sure you don’t break other people’s integration.
And with that, we’ve got this covered!